Tinus arranged a set of Kut Snake flares for myself (and another set for my old man), and I installed them over the weekend.
It's actually not a very difficult job. It took longer to remove a bit of old silicon from a previous trim attachment attempt on the door than the installation actually takes. But the installation does require drilling holes in the body work, so "measure twice and drill once"...
There is an installation write up over here: https://www.the4wdshed.com/assets/brochures/GU1CS.pdf, but I will summarise briefly now.
Firstly, one has to remove the old flares. There is a write-up of this process here: viewtopic.php?f=46&t=6294&start=30
For the wheel-arches, one removes the bolts inside the wheel arches, front and back, and then you remove the flare by unclipping it from the clips. The clips will normally break off, which is fine. But try not to break the pieces where the clips fit into the flare. For the door trim pieces, there is a screw at the top of the door trim piece that you need to remove from inside the rear door. After that, you unclip the rest of the door trim piece. You can leave the screws off as the Kut Snake flare will hold the wheel arch lining in place once installed. I also removed all the little white plastic bits from the body work that the clips fit into. You can possible leave them on, as the new flare should cover these, but that is your call. Once all the trim is off, clean the body work underneath the trim pieces.
In my case, I had a bit of silicon stuck to the door from a previous "door trim repair" attempt. I first remove the larger pieces with a razor blade, after which I used Bostik Silicon Stripper. Apply it on liberally, leave it for an hour and then scratch off the silicon off with an old bank card or piece of plastic. Afterwards, clean the mess from the partially dissolved silicon from the area with water.
- bostik.jpg (52.15 KiB) Viewed 11136 times
Firstly, cut the trim beading to length for each section of the new flares where it will be between the bodywork and the flare. Stick it on to the flare with super glue. You don't need to stick the entire length as the flare will keep the trim beading in place once it is attached properly. But sticking each end of the trim beading to the flare, as well as a dab now and then and around any of the trickier curves of the flare simply makes it easier to work with.
Tools Required
4mm drill
5mm allen wrench
A helping hand
Back Quarter Panel
Place the back fender flare in position.
Align it such that the front of the flare is level with the inside of the door frame.
Make sure the inside of the new Kut Snake flare is flush with the inside of the wheel arch and that the back of the flare aligns with the body work.
Have your helping hand hold the item in position and then drill the hole for the front using the 4mm drill.
Put in the front screw (don't tighten it completely yet).
Keeping the flare in position, drill the hole for the back and put in the back screw (don't tighten it completely yet).
Now the centre hole can be drilled and the centre screw put in.(don't tighten it completely yet).
Tighten up the screws.
Note: Do not overtighten. These are self-tapping screws, and since they're screwing directly into the sheet metal bodywork, you do not want your righty-tighty becoming a righty-loosey...
Front Quarter Panel
Place the front fender flare in position. It must be pushed upwards and forwards so that the inside of the flare is flush with the wheel arch and the front body panel by the head light.
Have helping hand hold in place.
Drill front hole and install screw.
Keeping the flare pushed upwards against the arch, pull the back end of the flare back so that it is flush with the wheel arch.
Drill back hole and install screw.
Keeping the flare in place, drill the centre hole and fit the screw, and then the remaining two holes.
Tighten up.
Door Section
The door section of the flares consists of two parts. The outer flare (what you see from the outside of the vehicle) and a decorative piece that fits inside the flare. The decorative piece is only so that you don't look into this ugly gaping flare when the door is open. It fits inside the flare. The holes drilled to fit the flare will be drilled through this section and the screws will hold it in place when the flare is fitted.
Installation of the door section of the flares was the trickiest (for me at any rate) as one needs to twist it a little to get it to fit nicely.
Firstly, align the top part of the door flare with the back flare. There must be enough of a gap so that the two sections do not catch each other when the door is opened and closed.
Have helping hand hold this section in place, drill the topmost hole and fit the screw.
Now, twist the flare into position so that the inside of the flare is inside the front part of the wheel arch.
Drill bottom hole and fit screw.
Drill centre hole and fit screw.
Tighten up all screws.
Caveats with the door sections:
In my case, the door sections did not play well with my rock sliders and I had to trim a little bit off the bottom bits of the flares to get them working nicely, otherwise the bottom of the flare would catch the rock sliders every time I opened and closed the door. This can be accomplished with a Dremel and a small cutting disk.
Also, after trimming the bottoms off, the inside of the flare would catch the wheel arch every time I opened and closed the door. I corrected this with a heat gun and bending the inside of the flare a little away from the wheel arch so that it would not catch
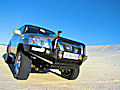
Ultimately, I'm very happy with how the installation went and what the vehicle looks like.
On a side note: I've got two sets of GU-1 GRX flares available should anybody want. But I'll make a new post for that.
- flares-01.jpg (1.99 MiB) Viewed 11136 times
- flares-02.jpg (1.73 MiB) Viewed 11136 times
- flares-03.jpeg (783.66 KiB) Viewed 11136 times
- flares-04.jpeg (710.92 KiB) Viewed 11136 times